Introduction
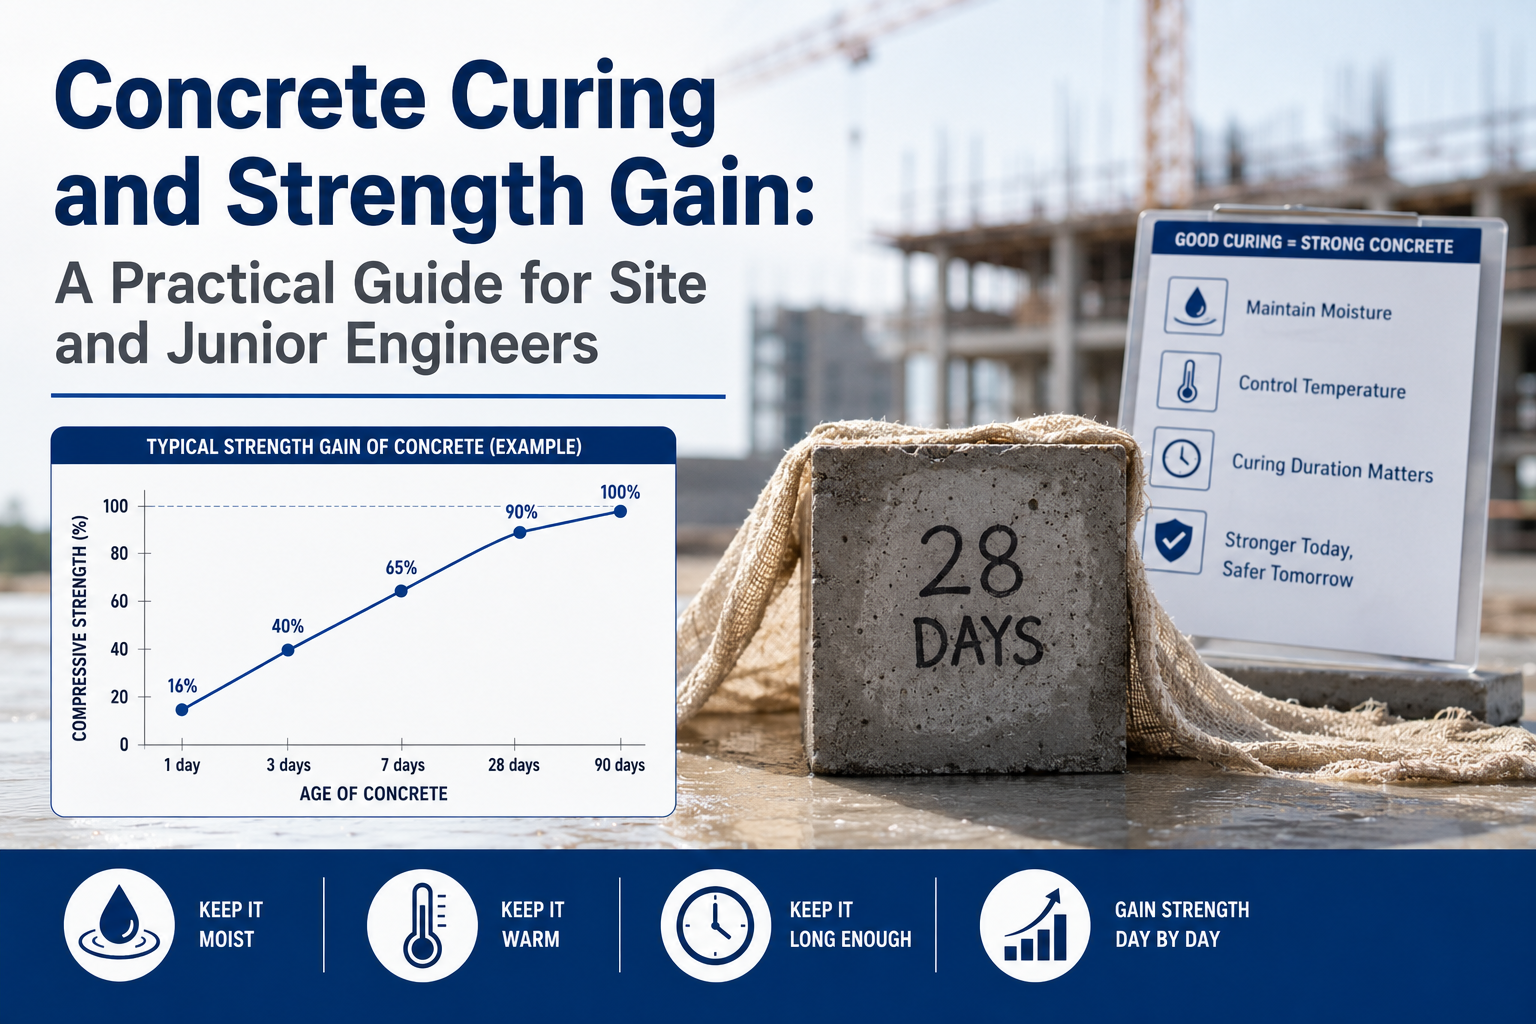
Concrete curing and strength gain are basic but critical topics for every junior engineer and site engineer. Proper curing controls the moisture and temperature conditions that allow concrete to develop strength and durability during the first hours, days, and weeks after placement.
This practical guide explains why curing matters, how strength develops, which curing methods work well on site, what engineers should monitor during the first few days, and how to respond when problems appear. In addition, the article provides simple site examples and a practical checklist that junior engineers can use immediately.
Suggested alt text: Concrete curing and strength gain timeline for site engineers
Key Takeaways
- Curing maintains suitable moisture and temperature so cement hydration can continue.
- Good curing helps concrete develop strength, surface hardness, and long-term durability.
- Common site methods include continuous water curing, wet coverings, plastic sheets, curing blankets, and curing compounds.
- Start the selected curing method as soon as the construction procedure allows after finishing.
- Keep a curing log and review test results before allowing loading, formwork removal, or other critical construction activities.
Concrete Curing and Strength Gain: Why It Matters
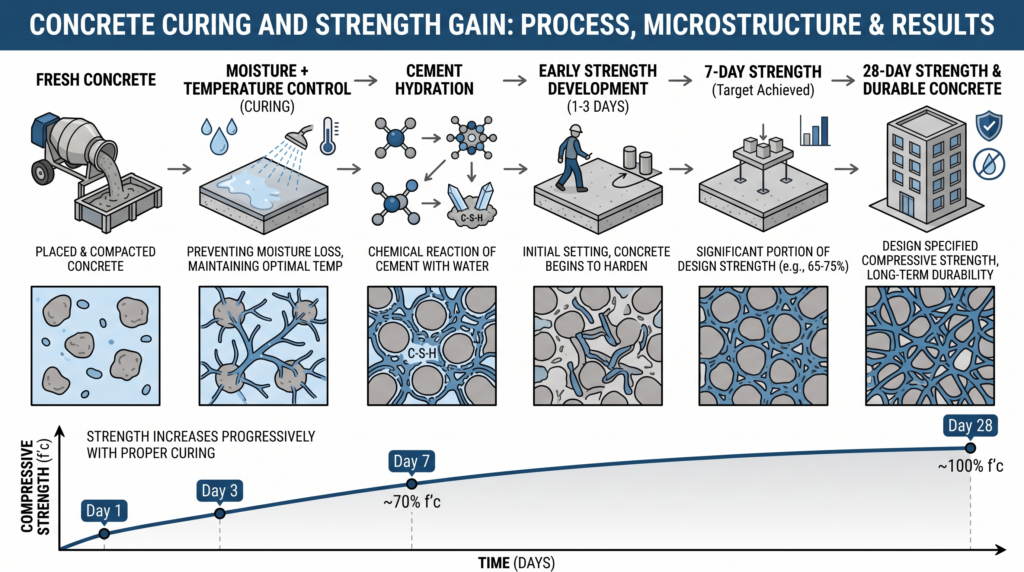
Curing maintains the moisture and temperature conditions that allow cement hydration to continue. During hydration, cement reacts with water and gradually binds the concrete constituents into a hardened material.
If the surface loses moisture too quickly, hydration near that surface can slow significantly. Extreme temperatures can also disrupt normal strength development. Therefore, site teams should protect fresh concrete from rapid drying, excessive heat, and freezing conditions.
Benefits of Good Curing
- Supports development of the specified concrete strength.
- Reduces the risk of early-age shrinkage cracking.
- Improves surface hardness and abrasion resistance.
- Reduces unnecessary permeability when curing and concrete quality are properly controlled.
- Supports better long-term durability and service performance.
By contrast, poor curing can contribute to weak or dusty surfaces, early cracking, increased permeability, and reduced durability.
How Concrete Strength Develops Over Time
Concrete gains strength progressively as hydration continues. Engineers commonly use the specified 28-day compressive strength as an important benchmark, while earlier test ages such as 3 and 7 days can help the project team evaluate early strength development.
However, test results should always be interpreted according to the project specification, concrete mixture, curing conditions, testing procedure, and required construction activity.
Temperature Affects Strength Gain
Temperature strongly affects hydration. Warm conditions can accelerate early reactions, but they can also increase evaporation and thermal effects. Cold conditions slow hydration, while freezing can seriously damage concrete that has not developed adequate early strength.
Moisture Affects Hydration
Concrete also needs sufficient moisture for continued hydration. When an exposed surface dries too quickly, the surface zone may develop poor hardness, dusting, or cracking. For this reason, engineers should select a curing method that prevents excessive moisture loss.
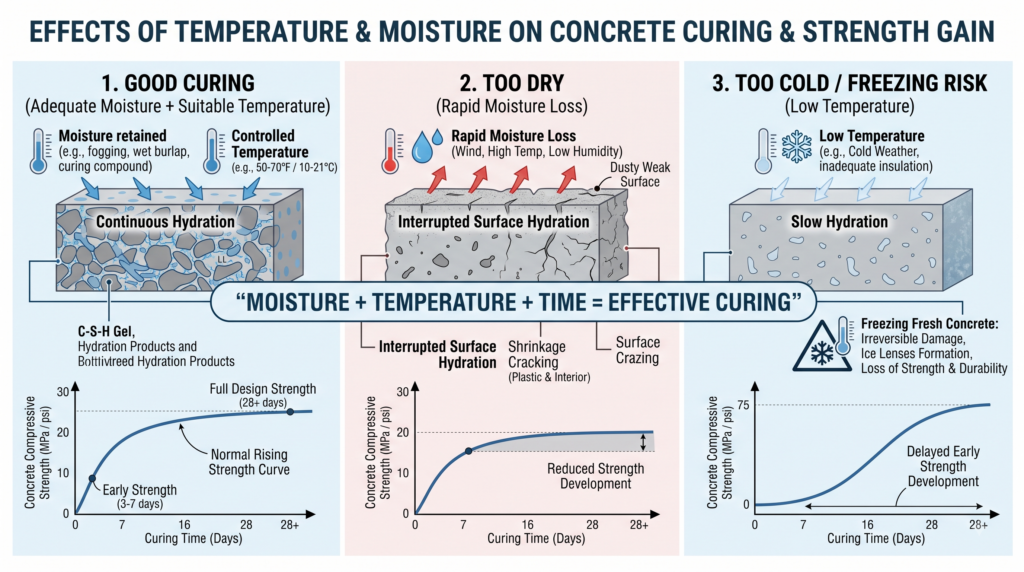
Suggested alt text: Concrete strength gain during curing with moisture and temperature control
Common On-Site Concrete Curing Methods
The best curing method depends on the structural element, weather, site access, water availability, labor, and future surface treatment. In practice, site teams often use one or more of the following methods.
Continuous Water Curing
Water curing keeps the exposed concrete surface continuously moist through ponding, sprinkling, fogging, or saturated coverings. This approach works particularly well for slabs, pavements, and other accessible surfaces.
The key word is continuous. If wet coverings repeatedly dry out, the curing process becomes inconsistent.
Wet Burlap or Other Absorbent Coverings
Wet burlap or similar absorbent coverings can keep surfaces moist when workers regularly maintain them. On exposed horizontal surfaces, a plastic sheet over the wet covering can help reduce evaporation.
Plastic Sheets and Curing Blankets
Plastic sheets and curing blankets limit moisture loss from exposed surfaces. Workers should secure edges and overlaps so wind cannot lift the covering and expose part of the concrete.
Curing Compounds
Liquid curing compounds form a membrane that reduces moisture loss. They can provide a practical solution for large surfaces where continuous wetting would require excessive labor or water.
Before using a curing compound, confirm its compatibility with any later coating, topping, waterproofing, or bonded surface treatment.
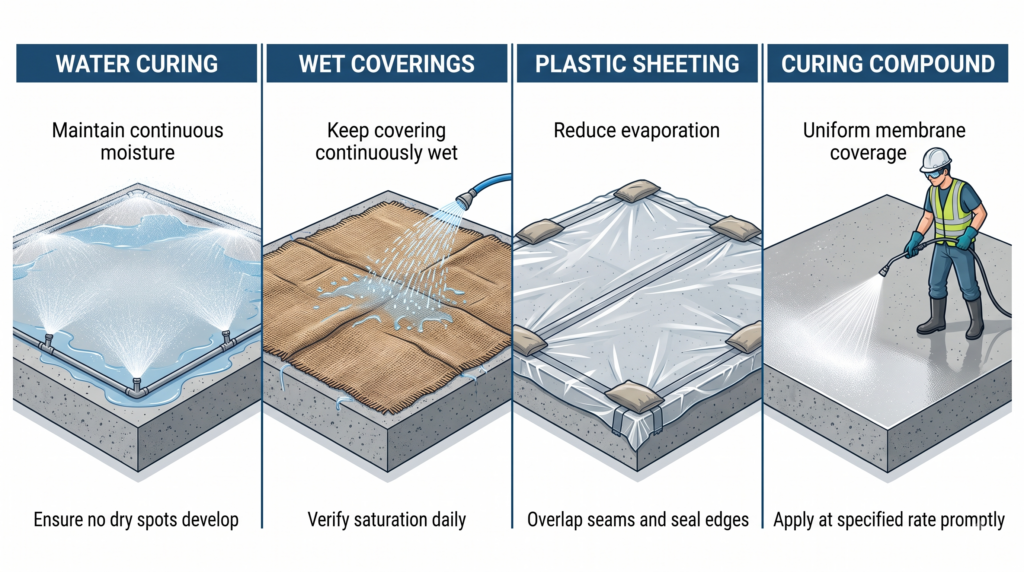
Suggested alt text: Common concrete curing methods used on construction sites
How to Choose a Curing Method
Before selecting a method, consider the element geometry, weather exposure, access, water supply, labor, and future construction requirements.
- Large horizontal slab: curing compound, wet covering, or another project-approved method may provide efficient coverage.
- Small slab: continuous wet curing can be simple and effective where water is readily available.
- Columns and walls: forms, wet coverings, membranes, or other approved methods can limit moisture loss.
- Hot and windy conditions: prioritize evaporation control and rapid implementation of the planned curing measures.
- Cold conditions: provide suitable protection and temperature control according to the project requirements.
Concrete Curing and Strength Gain: Site Workflow
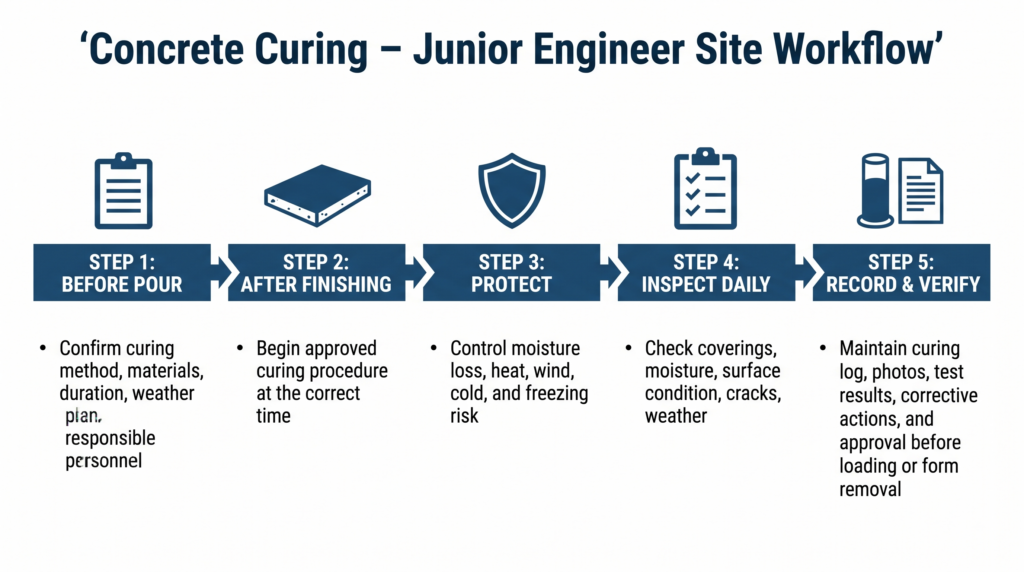
1. Confirm the Curing Plan Before the Pour
Before placing concrete, confirm the curing method, start criteria, responsible personnel, inspection requirements, curing duration, weather protection, and testing plan.
Discuss these items during the pre-pour briefing so the team can begin curing without unnecessary delay.
2. Begin Curing at the Correct Time
Start the specified curing procedure as soon as finishing operations and the concrete condition allow. Do not postpone the planned curing operation simply because the next shift has not arrived or workers are busy with another activity.
3. Protect Concrete From Weather Extremes
Use appropriate shade, wind protection, insulation, enclosures, or other project-approved measures when weather threatens the concrete. In particular, hot wind can accelerate surface moisture loss, while cold weather can delay early strength development.
4. Keep a Daily Curing Log
Record the curing method, start and stop times, weather conditions, inspections, observed problems, and corrective actions. Photos can also provide a useful record of site conditions.
If you are new to construction documentation, see Engimind’s guide to RFIs and daily site reports for a practical approach to keeping clear site records.
How to Monitor Concrete Strength and Curing Progress
Monitoring concrete curing and strength gain requires more than looking at the concrete surface. Engineers should combine site observations with the testing and acceptance procedures specified for the project.
Cylinder or Cube Tests
Coordinate the required concrete specimens and test ages with the project quality team and testing laboratory. Review test reports promptly and compare the results with the acceptance criteria and construction requirements defined for the project.
Do not remove formwork, transfer critical loads, or open structural elements to service solely because a certain number of days has passed. Follow the approved project procedure and obtain the required confirmation.
Daily Visual Checks
- Look for dry areas or displaced curing coverings.
- Check for early surface cracking.
- Look for dusty, weak, or powdery surface conditions.
- Confirm that wet coverings remain moist.
- Check whether plastic sheets or blankets remain secured.
- Confirm uniform curing-compound coverage where applicable.
If you identify an abnormal condition, record it and report it through the project’s inspection or quality process rather than relying on an informal visual judgment alone.
Other In-Place Strength Methods
Some projects use maturity monitoring, rebound testing, ultrasonic methods, or other in-place assessment tools. These techniques can provide useful information when the project establishes the appropriate procedures, correlations, calibration, and acceptance criteria.
Practical Site Examples
Example 1: Small Slab on Grade
Consider a 5 m × 5 m slab where the approved curing plan specifies wet curing. After finishing and at the appropriate starting time, workers place wet burlap over the slab and keep it continuously moist.
Next, the site engineer checks the covering each day, records weather conditions, and reviews the required concrete test results according to the project testing schedule.
Example 2: Reinforced Beam in Hot Weather
For a cast-in-place beam during hot and windy weather, the project team should implement the approved hot-weather and curing plan. Depending on the project requirements, measures may include controlling concrete temperature, scheduling the pour during cooler hours, reducing wind exposure, and protecting exposed surfaces from rapid moisture loss.
After placement, the team continues the specified curing and monitors the element for early cracking or other unusual conditions.
Common Concrete Curing Problems and Quick Responses
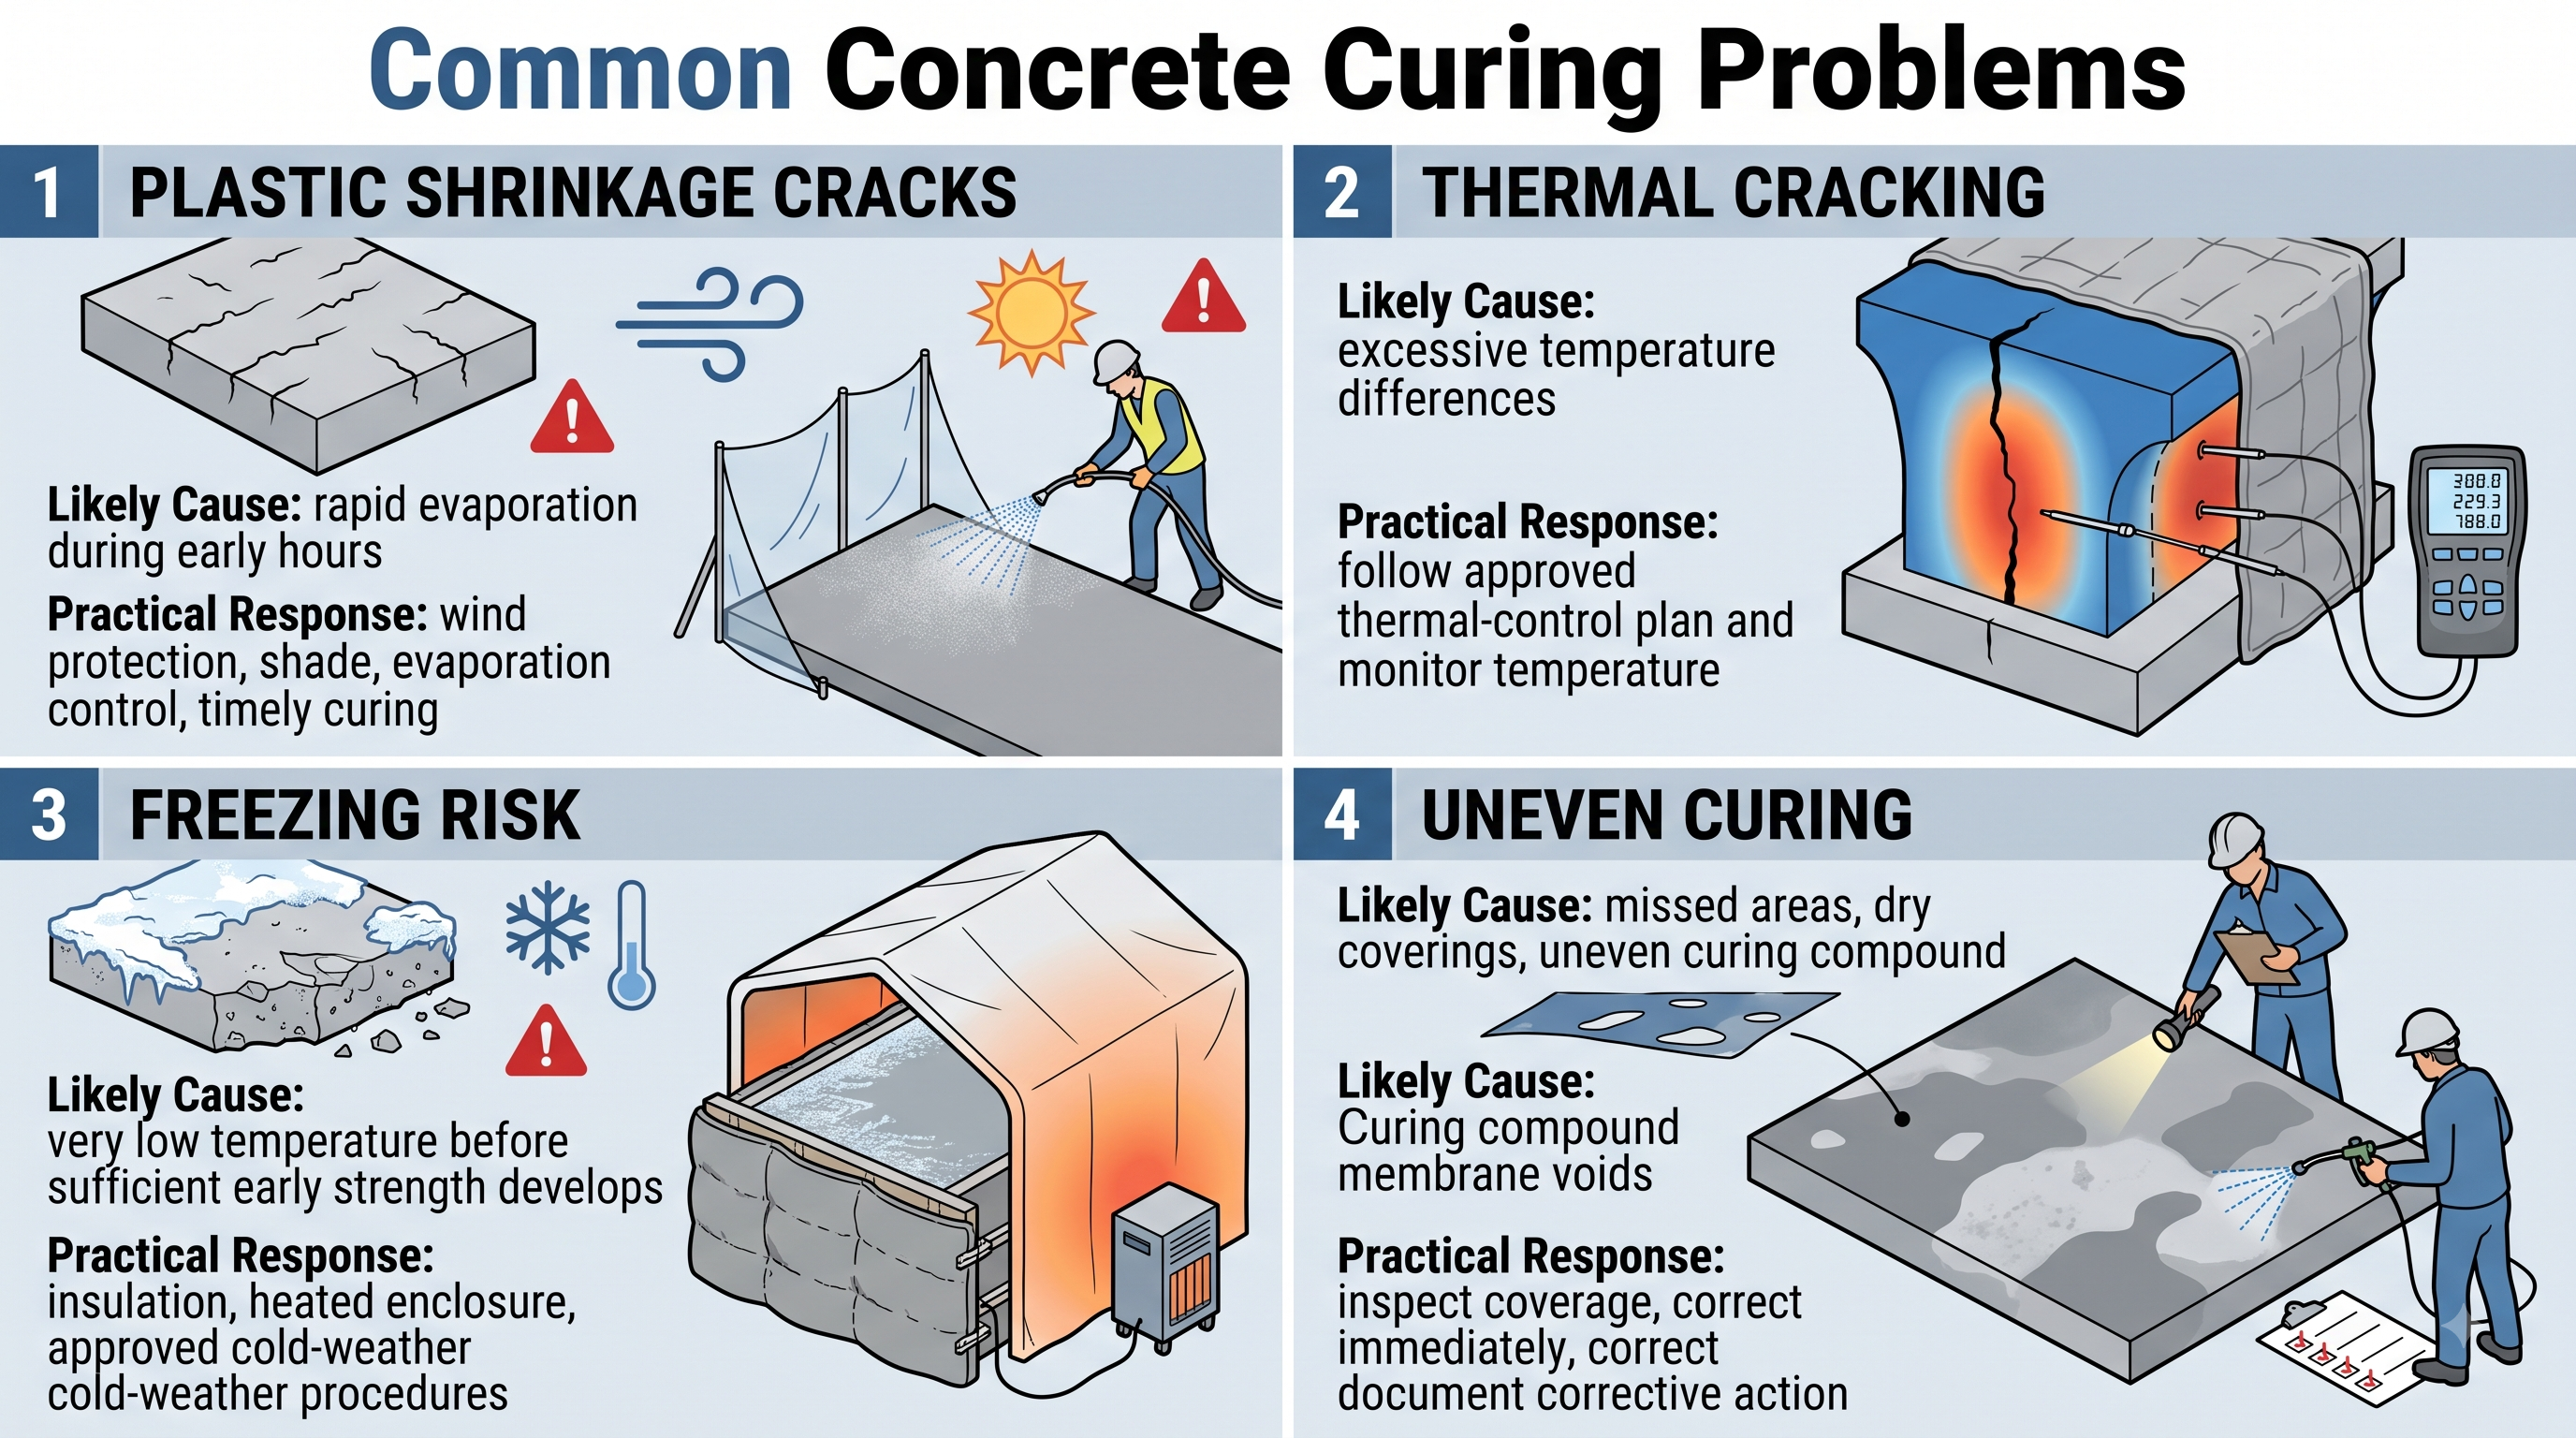
Plastic Shrinkage Cracking
Rapid surface moisture loss can contribute to plastic shrinkage cracking. Therefore, site teams should control evaporation using the measures specified in the pour plan, such as wind protection, shading, fogging, evaporation reducers, or timely curing.
Early Thermal Cracking
Temperature differences within concrete can generate thermal stresses. For larger or temperature-sensitive placements, engineers should follow the approved thermal-control procedure and monitor temperatures where the project requires it.
Freezing Risk
Cold weather can slow hydration, and early freezing can damage fresh concrete. Use the insulation, heated enclosure, mixture-temperature controls, or other measures specified by the project’s cold-weather procedure.
If forecast temperatures fall outside the approved construction limits, consult the responsible engineer or quality team before continuing the pour.
Uneven Curing or Surface Color Differences
Uneven coverage can create differences in moisture exposure and surface appearance. Inspect the curing system, correct missed areas according to the approved procedure, and document the corrective action.
Common Mistakes Junior Engineers Should Avoid
- Starting curing too late: Prepare materials and responsibilities before the concrete pour.
- Allowing wet coverings to dry: Inspect them frequently and maintain continuous moisture where wet curing is specified.
- Applying curing compound unevenly: Follow the specified application rate and inspect coverage.
- Ignoring weather: Wind, heat, cold, and direct sun can change curing requirements quickly.
- Removing forms or loading too early: Follow the project requirements and required strength confirmation.
- Keeping poor records: Record inspections, weather, testing, and corrective actions clearly.
Curing, Durability, and Material Efficiency
Good curing is not only a short-term construction activity. It also supports the long-term performance of concrete. When a structure achieves its intended durability, the project can reduce premature repair and replacement demands.
For a broader discussion of concrete and material impacts, see Engimind’s Embodied Carbon 101 for Junior Engineers.
Handover and Documentation Checklist
Before closing the curing activity, make sure the project records contain the information required by the quality plan. Typical records may include:
- Curing plan and approved method
- Curing start and completion records
- Daily curing inspection logs
- Weather records
- Site photographs
- Concrete test reports
- Recorded deviations and corrective actions
Clear documentation also makes it easier to understand how the completed structural element fits into the overall structural load path before the team applies construction or permanent loads.
Concrete Curing Checklist for Junior Engineers
- ✓ Confirm curing requirements before the pour.
- ✓ Prepare curing materials before concrete placement.
- ✓ Confirm when the curing operation should begin.
- ✓ Protect fresh concrete from rapid moisture loss.
- ✓ Monitor hot-, cold-, and windy-weather conditions.
- ✓ Inspect curing coverage every day.
- ✓ Record observations and corrective actions.
- ✓ Review concrete test results promptly.
- ✓ Do not authorize premature loading or form removal.
- ✓ Escalate unusual cracking, weak surfaces, or temperature concerns.
Conclusion
Concrete curing and strength gain depend on controlling moisture, temperature, time, and site execution. The concept is simple, but poor curing during the first hours and days can create problems that remain with the structure for years.
For junior engineers, the practical workflow is straightforward: confirm the curing plan before the pour, begin the approved method at the correct time, protect the concrete from weather, inspect curing every day, maintain clear records, review test results, and respond quickly when conditions change.
Most importantly, do not treat curing as an activity that belongs only to the concrete crew. Engineers, supervisors, quality staff, and contractors all play a role in making sure the concrete receives the curing conditions required by the project.
Sources and Further Reading
- American Concrete Institute — ACI PRC-308-26: Curing of Concrete—Guide
- Portland Cement Association / American Cement Association concrete technology guidance and Design and Control of Concrete Mixtures.
- Project specifications, approved method statements, concrete quality plans, and testing procedures applicable to the specific project.
Technical Note: This article provides introductory educational guidance for junior engineers and site staff. Always follow the applicable project specifications, approved curing procedures, concrete mix requirements, testing criteria, and instructions from the responsible engineer and quality team.